Friday, June 29, 2012

Candling eggs

We currently have a few duck eggs and chicken eggs in the incubator. No this is not an expensive (we picked it up from EBay for a little over $60)and yes we do turn the eggs manually. However we have successfully hatched 2 rounds of chickens, so since our ducks have started to lay, we’re attempting them too.
So I thought I’d just take a few pics of the ‘candling process’. Essentially after approximately a week (for chicken or in this case duck eggs) we take a small (hand sized) LED torch, place it close to the egg shell, in a darkened room (or corner) and you can clearly see the actively inside.

Now anon-fertilised egg will remain distinctly fluid and you will be able to identify the yolk, it will bob to the top of the egg as it is turn. We remove these (allowing more room for the eventual hatching chicks/ducklings).
In these pictures (although their not great quality- I’ll try and get better ones next time) you can clearly see a solid form developing, and veins. These eggs have been fertilised and are growing little birds!
Place these back in as soon as possible and replace the lid, as they need to be kept at a consistent temperature and humidity. Too long out of the incubator could destroy their development.   

Sourdough Starter

Meet the most recent addition to the house. Apparently I should build a relationship with this and treat it as a pet. Well it should be with us for some time and I have to nurture and feed it- so I can see the comparison.
 This is my sourdough bread starter. We are following the recipe/instructions from our favourite series/author Hugh Fearnley- Whittingstall and River Cottage. (We have follwed this from the first series on Channel 4 in the UK, and is available on lifestyle on Austar for anyone in Oz. I actually booked Matt into a day course at River Cottage HQ, on our visit home last year.- but now I'm going off track. But basically if you get chance to look this up; there's a website, books, DVDs TV series I recommend it!)  http://www.rivercottage.net/

Anyway, from the series and the Bread handbook (3), we have started our own sourdough bread starter.
Basically this will produce live yeast that we will use for our bread in the future. With each batch you use half your starter and then feed it, to replenish the stock for the next.

To start we have used 150g of wholemeal flour and 250ml of warm water, whisked and left to develop. Cover with a lid or Clingfilm (this isn't clear initially in the instructions, so ours took 2 days to start developing). Then when you can see some action (bubbles and the beginning of a fermenting smell) add a further 150g of flour and 250ml warm water, whisk then recover. On the 3rd
day you now discard half the starter (or use it to start a second) then add 150g flour and 250ml of cold water. This process is continued for the remainder of the week. At this stage it should be ready to use for baking.

At this stage we are at day 5. Am hoping to use this starter on Sunday, if not then I should have time next Friday, so it should be beginning to develop its own flavour and aroma; As each starter will be individual to its environment.


I was initially concerned (as we live in the tropics- not that is an
 issue at the moment, as its winter) that the starter would become too active or smelly, but if your only planning on using it once a week or less, then the activity can be reduced by keeping it in the fridge (you can even freeze it). So I am hoping this system will work for us. As a batch (or ½ the starter) should produce 2-3 loaves (depending on their size etc), which would be ample for us.

So meet our sourdough starter, its 5 days old…   


Thursday, June 28, 2012

Just bought some more seeds

I am so excited! As I hve just bought another batch of seeds for my veggie patch, as well as a few for the garden and in preparation for the herb garden Matt is planning beside the shed.
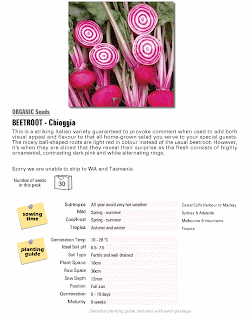
I've bought them on Ebay from 2 of my favourite sellers; celebrationvillage (Aneesha) and heritageseeds. These guys supply heirloom seeds, and some rare type within Australia (and not to WA or TAS), so sorry if I just got your hopes up.
And thier really good value and celebrationvillage send really helpful little planting notes (heritageseeds details are on the listings) and both have unusual and rare varieties of plants. Which always makes for exciting meals :)
Where possible I would recommend buying seeds, cutting, seedlings etc locally, as the plants have been successful in that area and are suited to the conditions.
But I have used both of these suppliers in the past with success and am hoping the hierloom varieties willprove fruitful in seed terms too. Then 20 seeds turns into a lifetime supply of fruit/veg/herbs.

This time I bought;


Thai Basil, Dark Basil (opal), Sage, Cumin, Chives, Garlic Chives, Dill, Parsley, Oregano, Bok Choi, Red Pak Choi, Wombok, Rainbow silverbeet, Artichoke, Golden zucchini, Chioggia Beetroot (a stripey variety), Brussel Sprouts, Burdundy Okra, Italian Radicchio mix (12 varieties), Chicory, Celeriac, Kokl Rabi (Purple), Cress, Armaranth (red), Rhubarb & Alyssum (royal carpet)- flowers for ground coverage and hopefully fill in the spaces in the garden path... now I just have to be patient until they arrive!

Wednesday, June 27, 2012

My Seed Box


Now this may seem a little lame to some, but as a self confessed control freak I felt the only way to manage my planting (and hopefully harvesting) effectively was to get organised. And this should keep all my seeds I generate in one place too. (Instead of finding little money bags and plastic containers everywhere, and trying to guess what they were from)

So for anyone thinking about planting, this is my strategy and I guess time will be the judge, so we’ll see how it goes.
I bought a 'recipe box' from the Officeworks (a shoes box, cd box anything of that size/description would do) and a set of cheap dividers (12- one for each month). I cut the dividers down so that they fitted in the box with their tabs.
I have drawn pencil lines on the back, so I can list seeds as I add them.

I also bought 100pk of 'seed envelopes'; their apparently moisture controlled. Although most of my seeds are in sealed money/plastic bags anyway.
I then wrote the fruit/vegetable, variety and months to plant (off spec sheet and/or internet/book research) on the front, I also noted “heirloom” varieties. As these I can (hopefully) collect seeds from these plants for future planting. I will also add dates to these packets, so I can reuse them every year.

Then on the back I listed the planting instructions- row distance, depth, estimated germination and maturity times and specific notes/conditions, such as soil type, mulching, watering details, when to transplant, if need to start in pot/try etc. Also if a plant has specific companions or plants to avoid. So I know to consider these when planting out.

I then placed each packet in the next month that I will use them. So plants that will grow all year will move into each month at the end of the current one. So I placed them in July, ready for the weekend.
Whilst those that grow from February- June (for example) I placed in February and will then move into the next at the end of each of those months.
 
I have done this as I have 3 reasonable size raised gardens, but not an unlimited amount of space, so for the most productive use of space and planting time, I need to be organised. Also as there are only 2 of us (and animals will get a share, I sure) I try to plant appropriately; we would not use 12 lettuces at once, but if I plant 1-2 seeds each week, I will hopefully achieve a constant and consistent supply.

Also in my box are the labels that I bought from Bunnings at the weekend. As last year I mostly grew veg that I bought as seedlings. I found growing from seeds can be interesting, especially if your trying new varieties… there are a few successful plans in garden at the moment that I am not sure about the identity of! So hopefully I won’t be doing that again ;)

Well I’ll let you know how successful this is when I tackle the veggies patch/ seedling tray this weekend.

Tuesday, June 26, 2012

Garden plans


Friday we made a visit to Sarina Landcare Catchment Management Association Inc. (SLCMA) www.sarinalandcare.org.au
As members we are allowed up to 20 native trees from thier nursery- for free! They will also visit your property and give you personalised advise, about what to plant for your needs, conditions etc. We had someone come out a few weeks back- If your local management association offers this, I highly recommend it. I mean local knowledge is envaluable, especially to newbies to this like us, especially being foreigners any advise is gratefully appreciated.
So we left with 35 trees, all of which are currently 'weathering' on the patio; whilst we we make final decisions about thier final destinations.
The lady also wrote the common and latin names on the labels, so I can look them up myself... Note to self I still need to do this. 

Over the weekend we also took some cuttings from existing trees around the garden; lime, lemon & bay. We bought a propogation podwer from Bunnings, so will let you know how this goes

And for the planned herb garden near the shed, I potted some parley that had sprung up in the walkways of our now raised gardens. We planted this (rather unsuccesfully) in the ground level garden last year- funny how plants germenate themselves and turn up where you least expect

Monday, June 25, 2012

12 months on... life at Maes-y-Delyn

29th of June is the first year anniversary since we collected the keys to Maes-y-Delyn, we moved in on 30th... so I am looking at his blog and wishing I had taken the time to update it and blog more often- no matter how insignificant it seemed.


So I intend make 2-3 blogs a week (with or without photos etc). Now I know we have achieved so much in that time, but there is still always things to do, new things to learn and new challenges to meet. All of which I intend to tkae head on, and online!


So at the moment I am making a fresh start with the veggie patch. Having raised the beds, following the deluge of last years wet season.
We still have 2 huffers (at least for the time being), we have 3 pigs. Our breeding pair, Smokey & Streaky (for which we are still waiting hopefully) and a Berkshire-Saddleback x which we bought locally for the freezer.
3 roosters, "Rocky" our Light Sussex, an Indian Game rooster and and Old English Game, who is to find a new home. 4 Indian game hens, 4 "commerical layers", 2 RIR x, 1 RIR, 1 Wellsomer, 1 laying light sussex, 2 (hopefully hens) from our first hatchlings, 4 light sussex from our second and 5 'Ross-cobs' (commerical meat birds).
1 Muscovey drake and 5 hens.